Fall One Room Challenge: Final Reveal

This project was created in a partnership with the One Room Challenge Sponsors!  

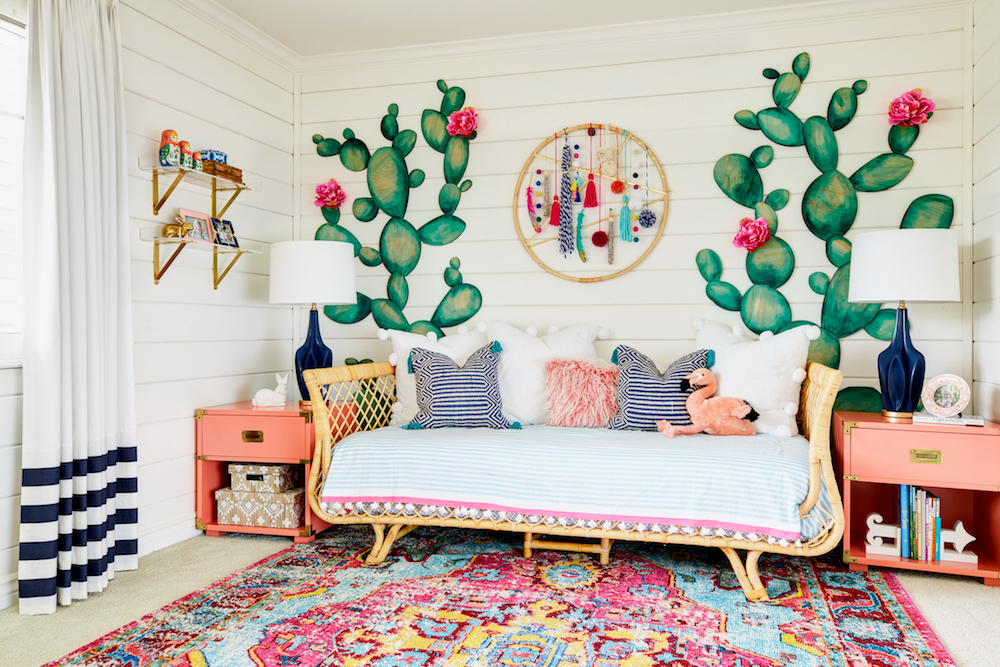
Today is the big day friends! The final reveal of the ONE ROOM CHALLENGE!!!!! This is really such a fun event to participate in. This is my second one room challenge and again one of my absolute favorite rooms in my house! There is nothing quite like the one room challenge to get this designer on track and get a room finished at my house. My house always takes the back seat to my client’s spaces, so it is really fun to treat myself with a little design time!  Are you ready? Here she is…


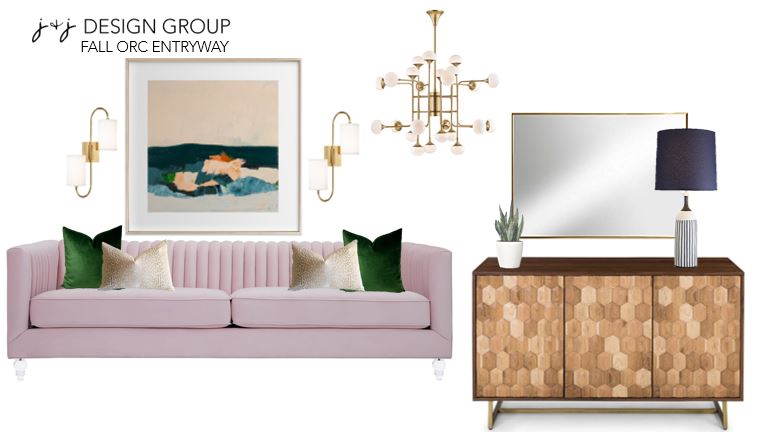
Sources: Blush Sofa: Hayneedle     Artwork: Minted    Sconces: Hudson Valley Lighting   Pillows: Homegoods   Blanket: Homegoods

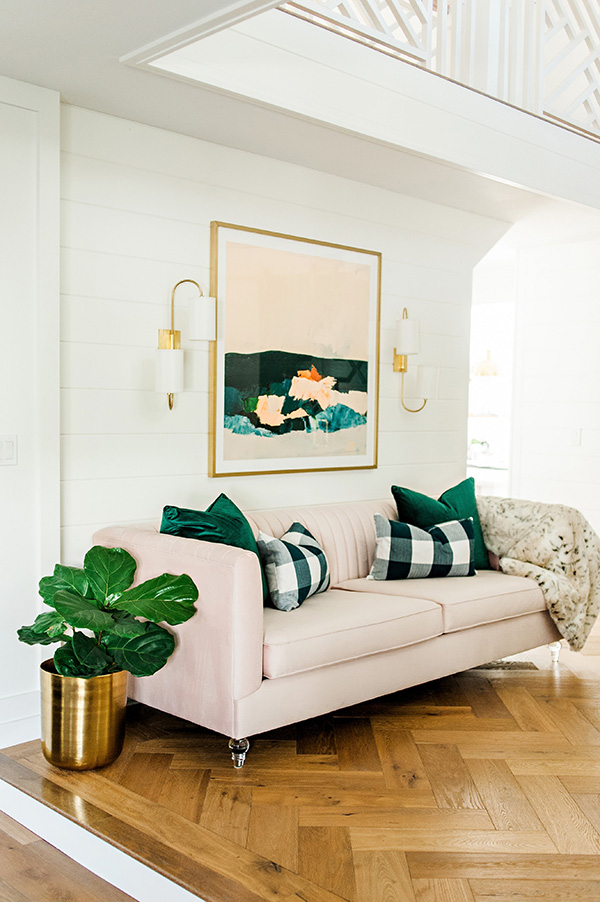
Let’s break down this beautiful space shall we? Let me just start by saying that this blush sofa is may be the softest piece of furniture I have ever felt. I’m not even kidding, it is so comfortable. We have been finding ourselves sitting in the entryway just hanging out. My kid’s have been playing on their tablets on it and my husband and I have sat there and chatted about our day. This sofa is seriously amazing!

I knew that I was going to need a large piece of art to set the stage for my color scheme in this room. This gorgeous artwork has the most vibrant tones of teal, emerald, navy and blush. I feel like it really ties everything together. This artwork made the green on my barn doors and my blush sofa make sense together in my room. This artwork is 44″ square with a matte brass frame and makes a big statement in the space.

The artwork is flanked by these mid century inspired sconces. I love the lines of these sconces and they give off a decent amount of ambient light. They have just the right amount of whimsy that I love in a fine piece of lighting.

Let’s not forget about the other side of the room, it is really just as pretty!


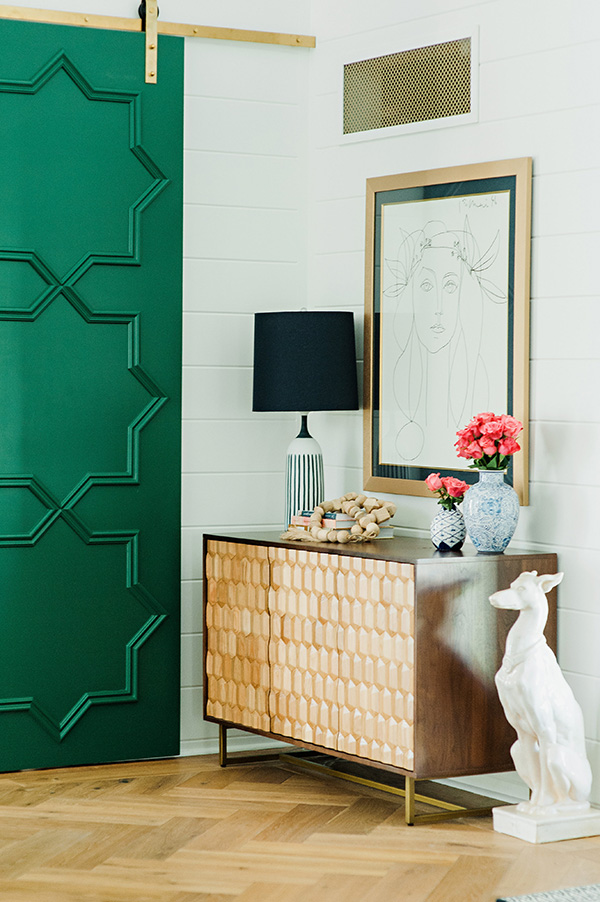
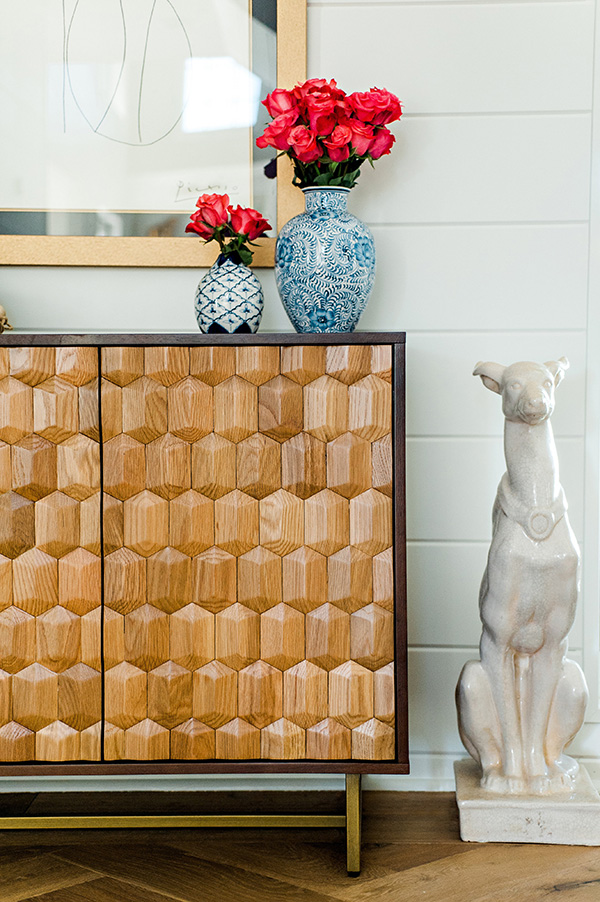
This pretty sideboard from Article is the perfect addition to my home. It provides so much storage and the wood details on the doors are so beautiful. I knew that the tone of the buffet would pull in my flooring and pop so pretty against the green doors we made.


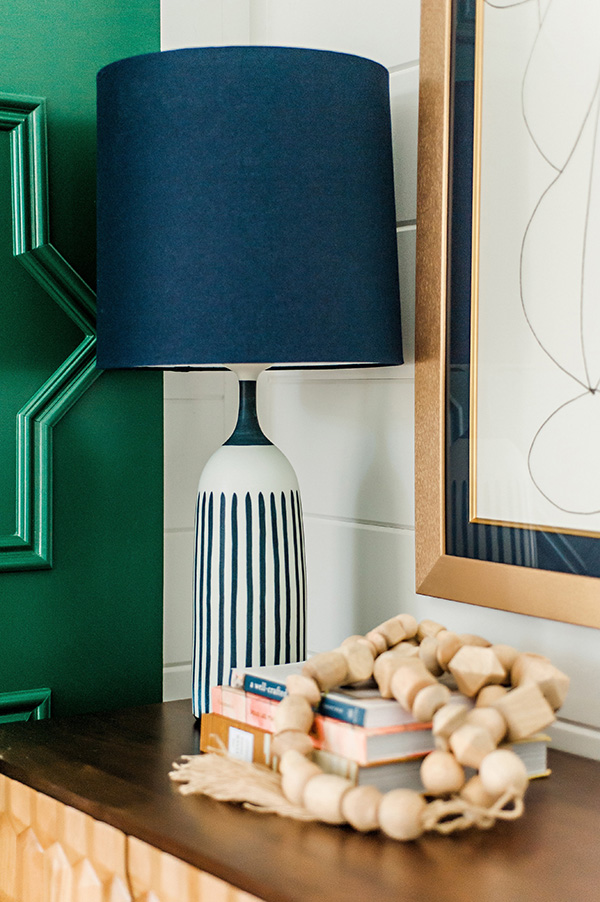
Atop the sideboard sits the prettiest lamp from Lamps Plus. My walls in this room are all white v-groove moulding so I wanted something with color that would pop off of the walls. A lamp with a white shade just wouldn’t have been as striking. The navy on the shade is a perfect complement to the artwork across the room.

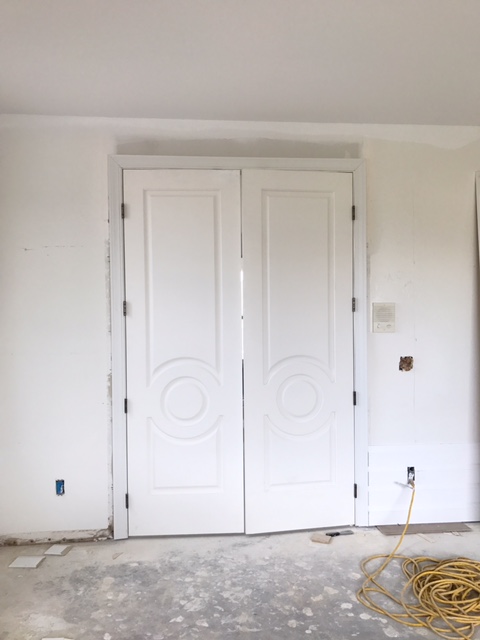
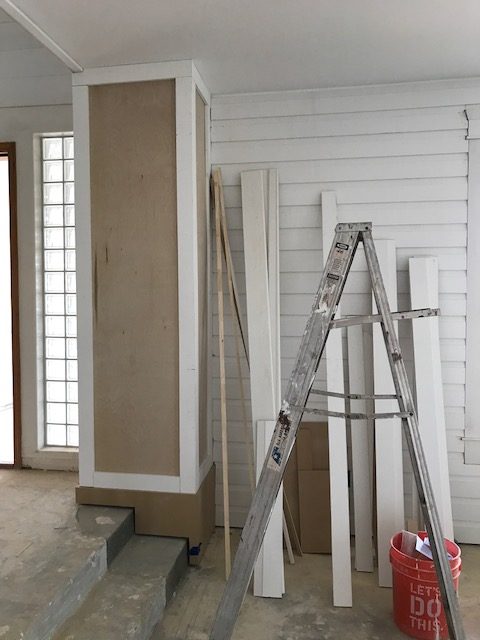
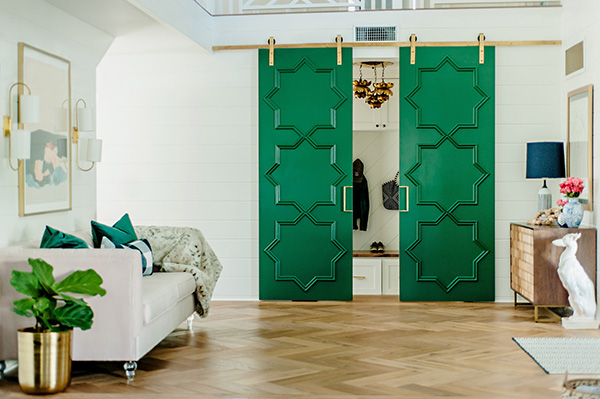
The green doors my husband I made turned out better than I could’ve imagined. I decided to paint them Billiard Green by Dunn Edwards. This was the deeper green I was going for but had that hint of blue I was looking for as well.

The reason I decided to go with the bold green doors is that I felt like they helped break up all the white of the v-groove moulding a little, oh and I love to take a good design risk!

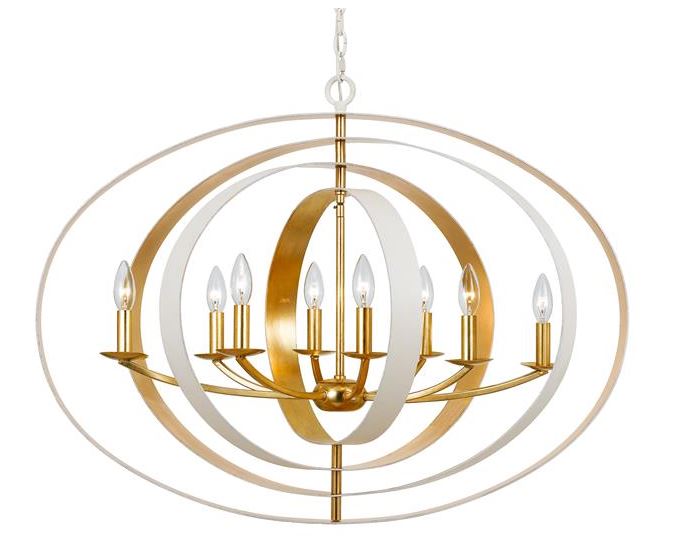
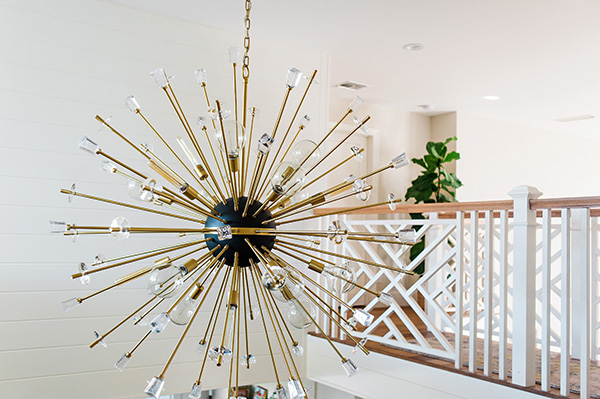
There is one more gem in this room that might be it’s crowning glory. It is very hard to photograph the room with the gorgeous chandelier because it is a 2 story ceiling height. I promise you won’t be disappointed!

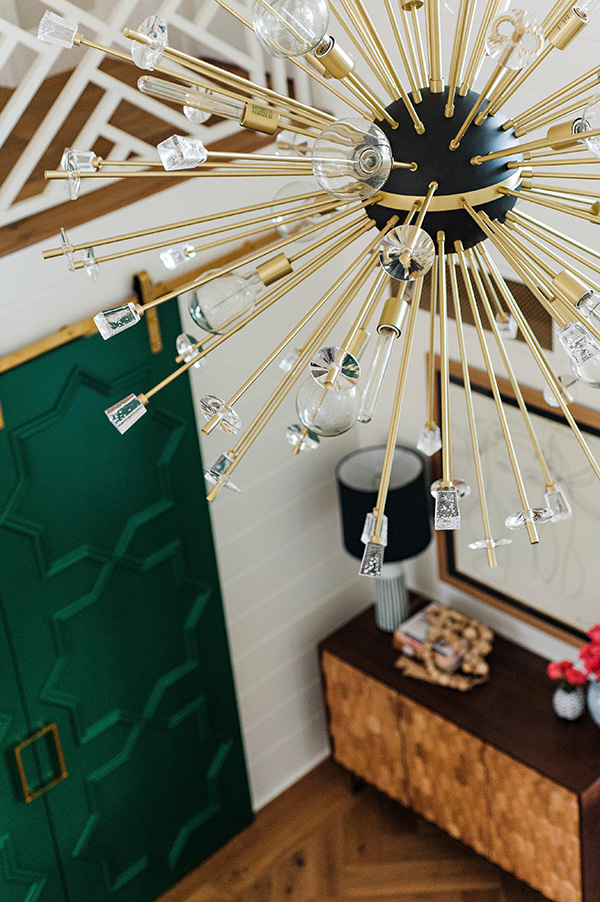
This chandelier from Hudson Valley Lighting makes a big statement in the room at 46″ wide. Once you walk in and look up you are greeted by this beauty and I honestly love it so much. This 2 story ceiling can really take a large chandelier like this, It is even more impressive when you are upstairs and you can look at it eye level, it is a stunner!

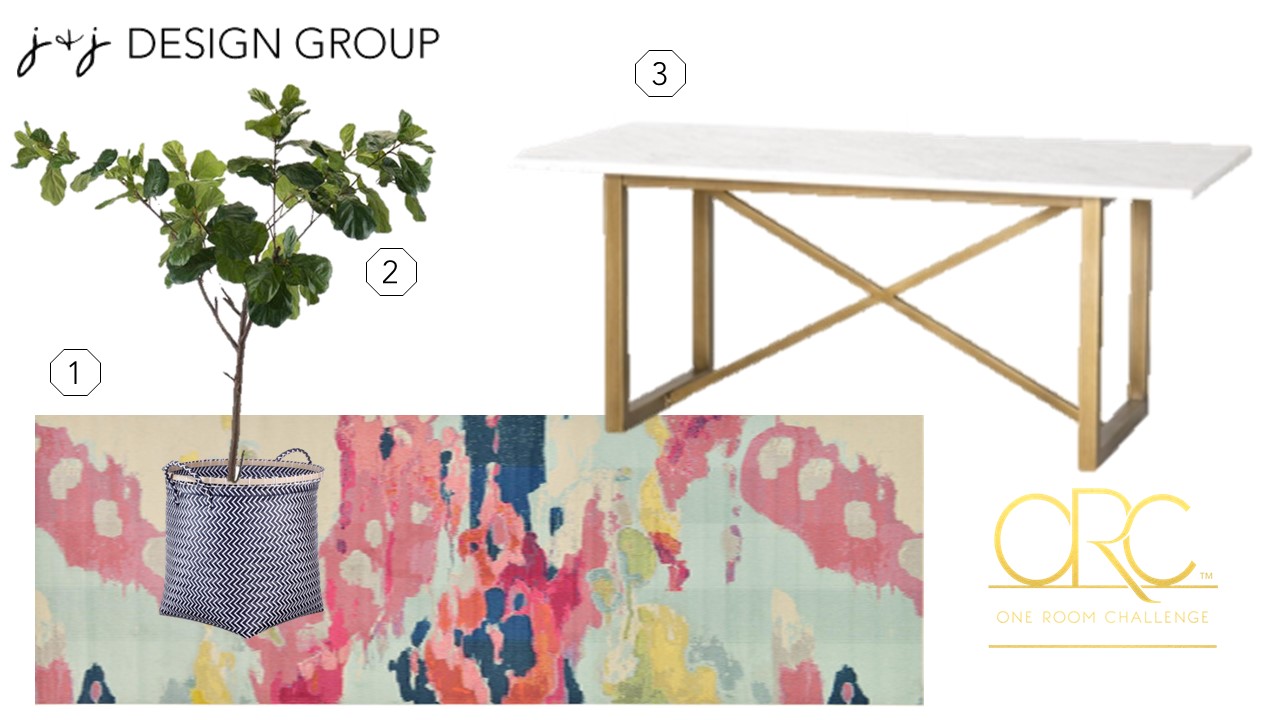
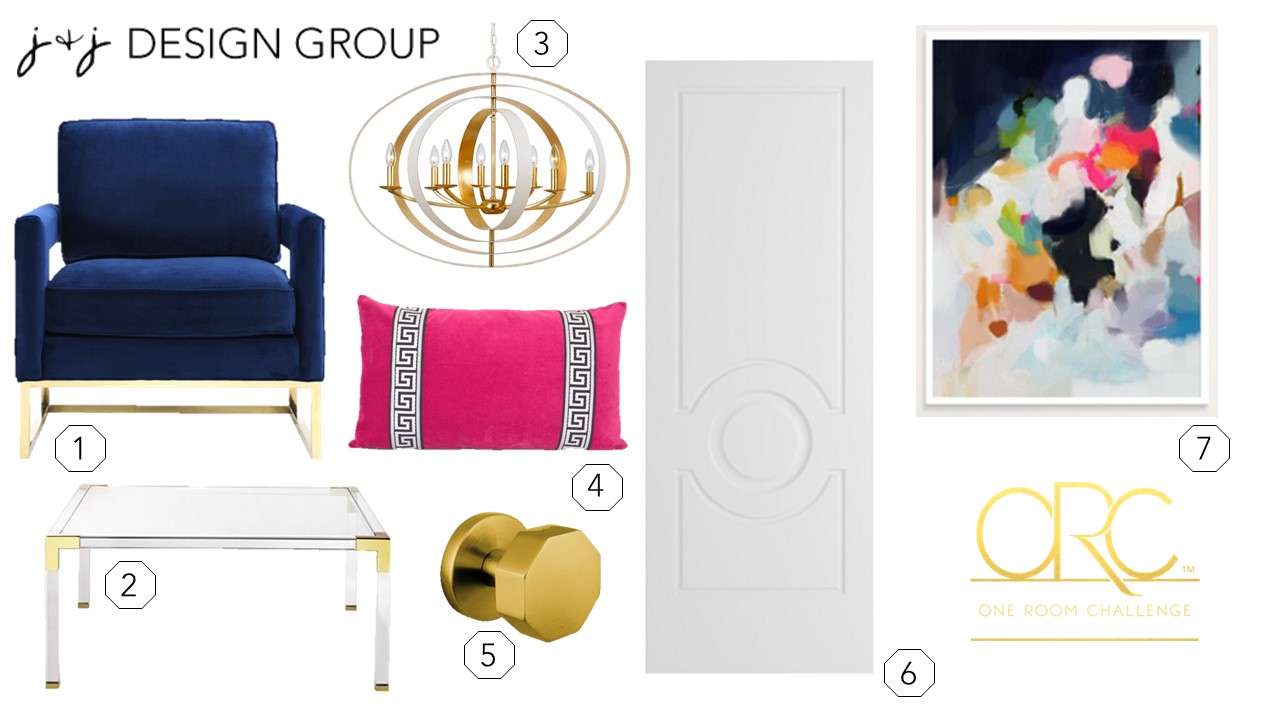
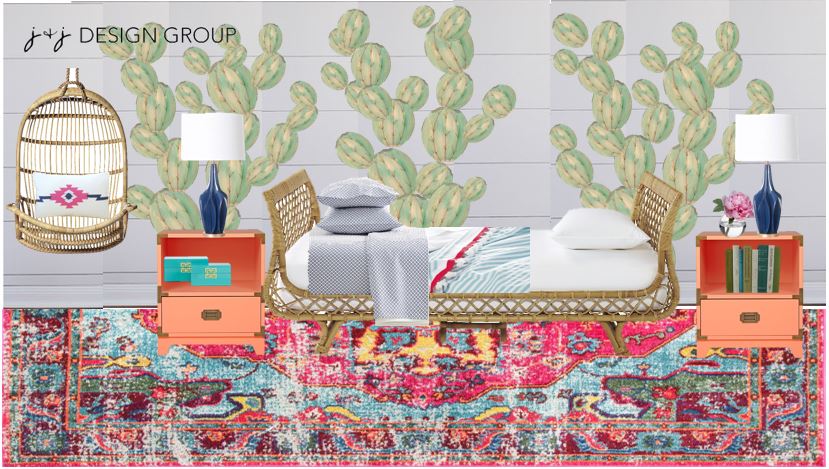
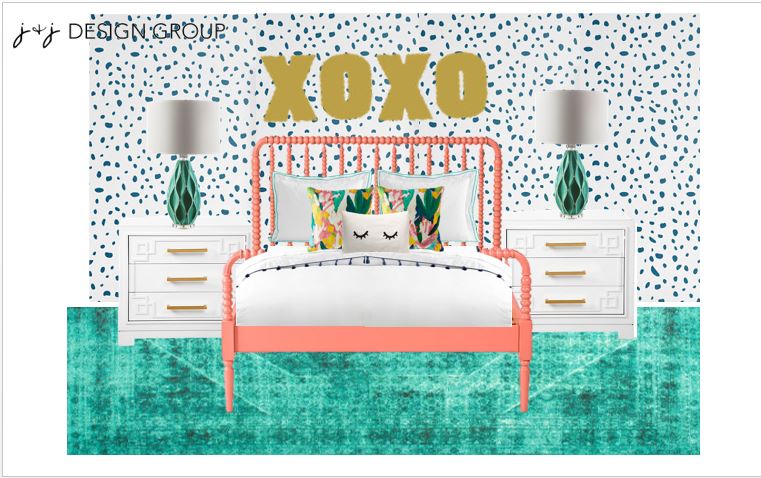
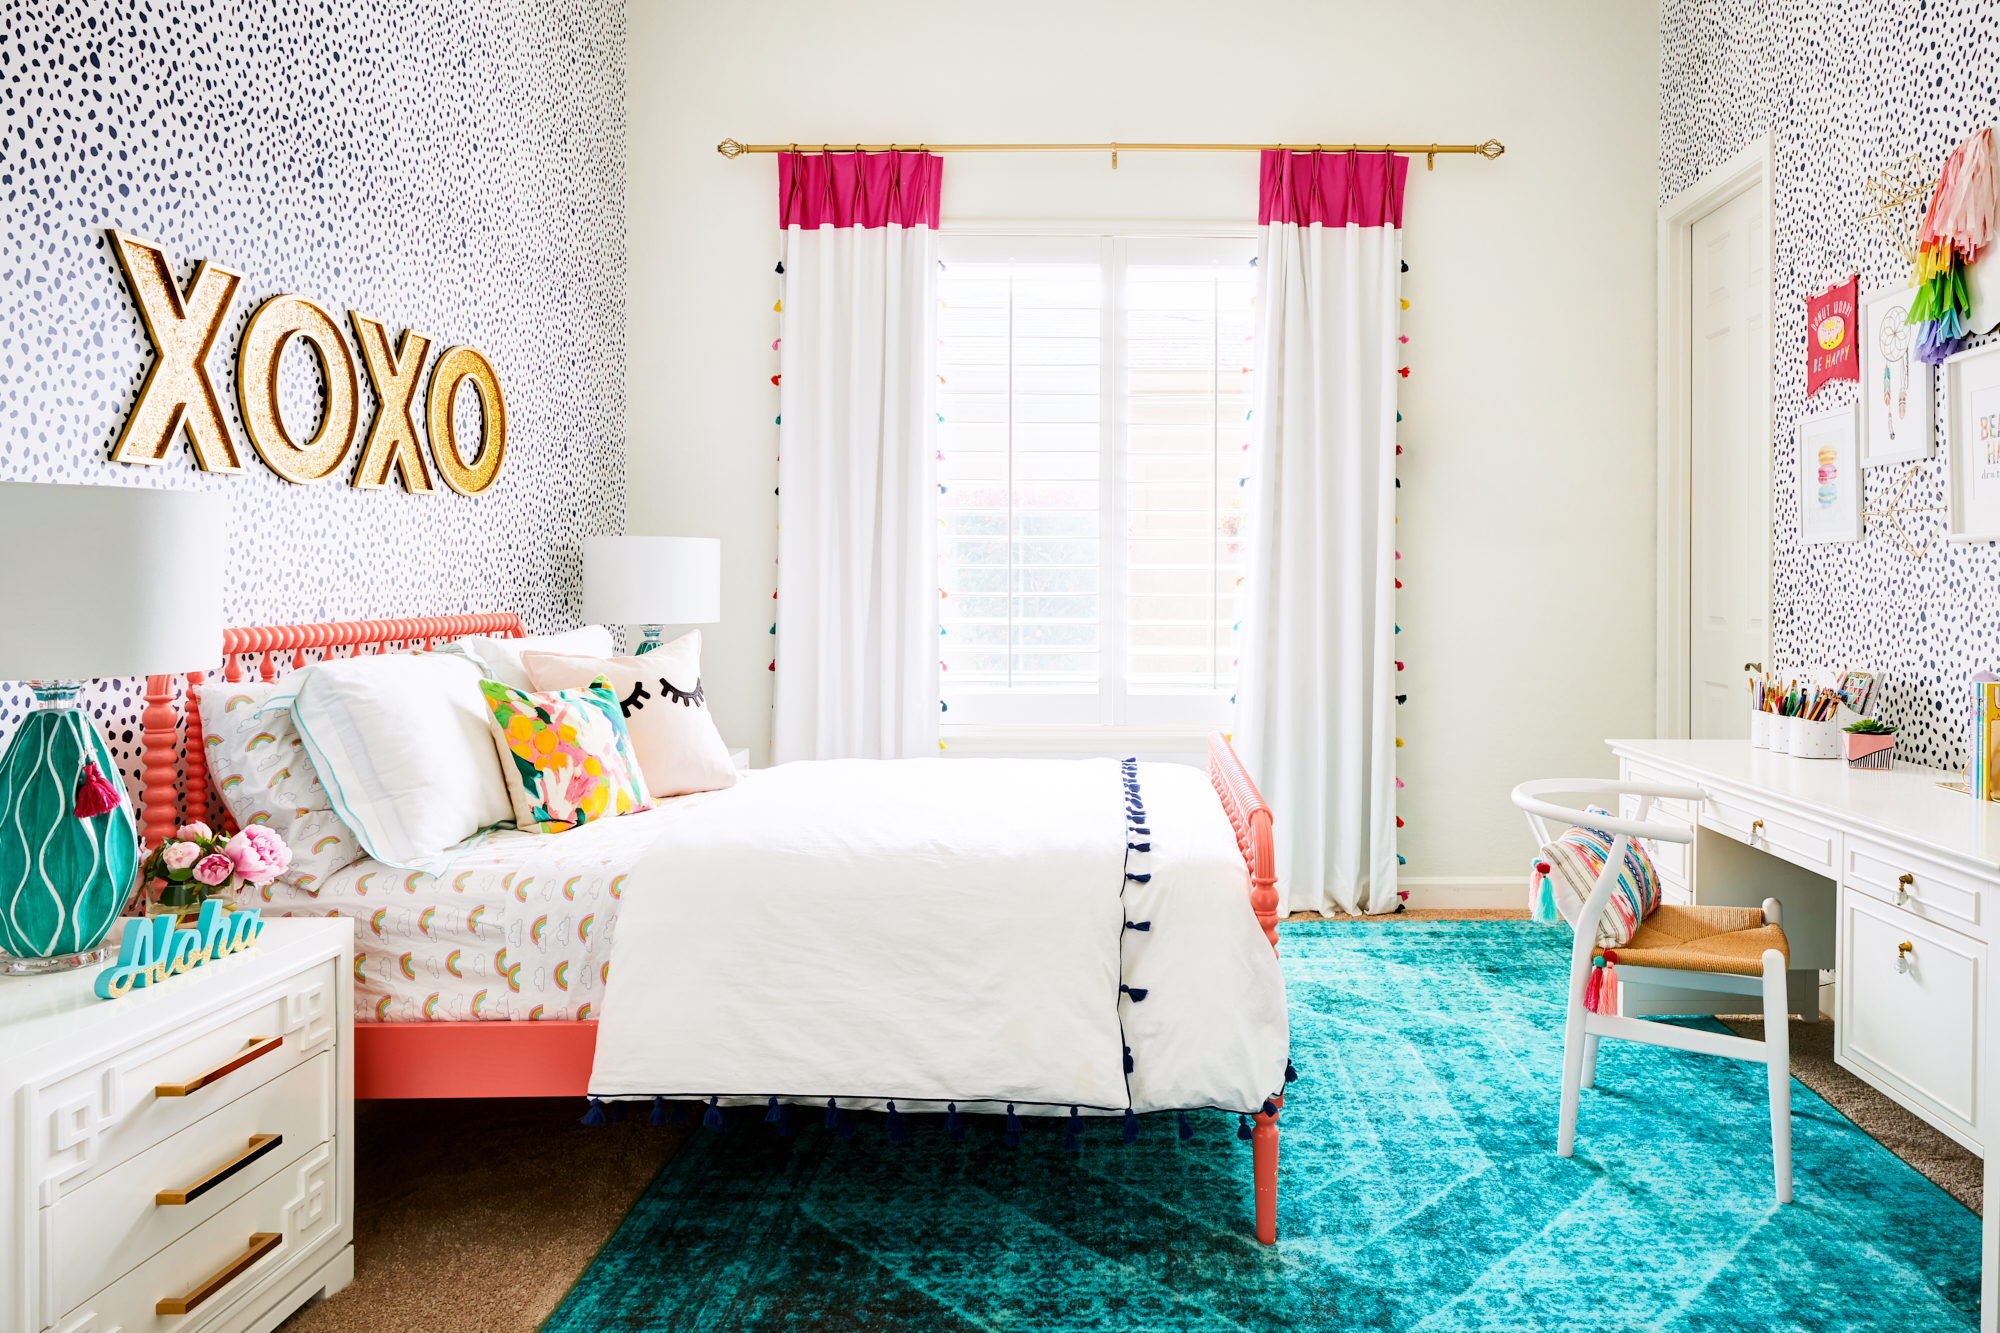
One of my favorite parts of finishing a project like this is to look back at the design board I created to see it all come full circle. What a satisfying thing to see your vision come to reality and that is why I love what I do.

I hope you are inspired to overhaul a room at your house and don’t be afraid to make yourself a design board. Design boards are very easy to make on Powerpoint, you will feel like you have a direction and a plan to execute. Be sure to check out all the reveals of my fellow challengers. Some of them took on some pretty hefty projects this season and some really beautiful designs have been executed.

XO,

All photos by: Jackie Lindfors, Everydayness Photography

At Home with Ashley | Bre Purposed | Dabito | The English Room | Erin Kestenbaum

Harlow & Thistle | House of Brinson | J & J Design | Kelly Golightly | Linda Holt

Megan Bachmann | Michelle Gage | Mimosa Lane | Murphy Deesign | Vestige Home

Old Home Love | SG Style | Shay Geyer | Sita Montgomery | SMP Living

Media Partner Better Homes & Gardens | TM by ORC


Tween Girl Room Design Reveal

Little girls’ rooms are really fun to design! Maybe because I was a little girl once and I remembered how I loved to spend time in my room by myself drawing and daydreaming.  Times have changed a little with technology but I think as a young girl it is still important to have a space you can call your own.

This room was very special to me, this little girl had asked Santa Claus if Jo could design her room for Christmas. I mean, how cute is that?? I sent her a little video letting her know that Santa had contacted me and her parents played if for her on Christmas morning!

When I first saw this her it looked like it was for a very little girl. I knew that my little client was coming into her own and needed a space that felt a little more mature and still a little fun!

I first pulled together this design board to get her approval, and make sure I was going in the right direction.

She was so excited with what I came up with and couldn’t wait to get started! I knew I wanted to hand make some fun elements for her room that could make it a little extra special. I decided to make these fun XOXO sparkly letters for above her bed. I put them on top of this cute navy and white Dalmatian wallpaper.

I think the room turned out pretty close to my design board don’t you?

I added a desk area on the opposite wall of the bed for homework and long drawing sessions. The gallery above the wall reflects some of her favorite things like gymnastics and the beach.

There is also a fun hanging chair where she can hang out with her friends and spend time reading her favorite books.

A happy little girl and a happy designer! These are the types of rooms that I can really get my creativity flowing and have so much fun creating!

XO,

One Room Challenge: The Big Reveal

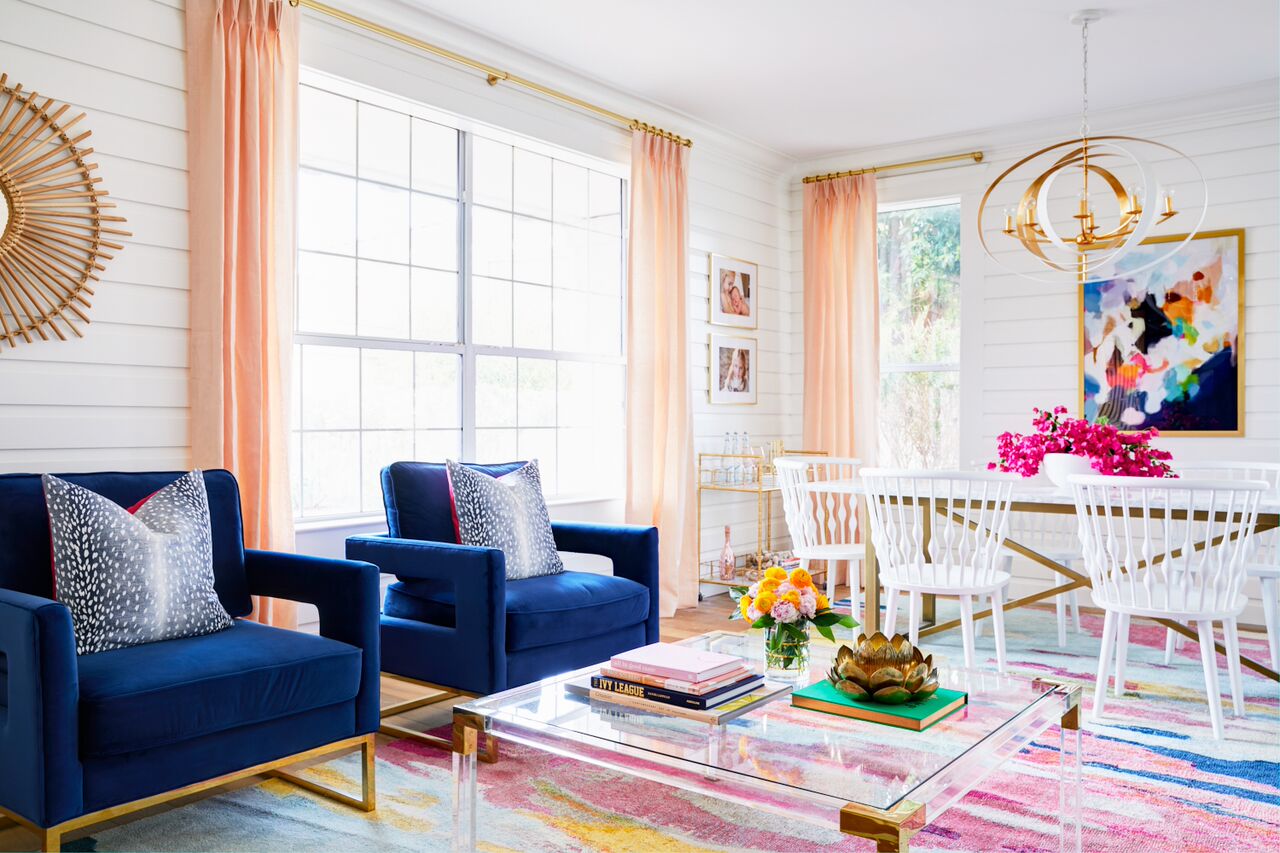
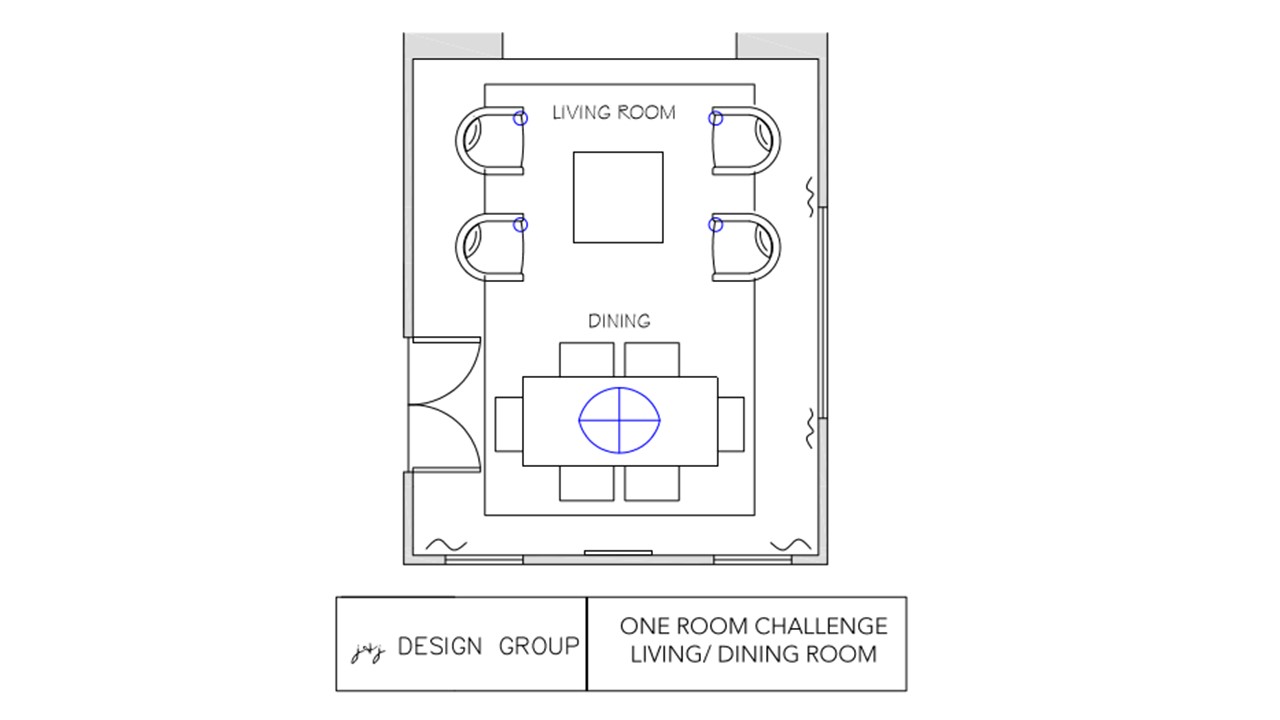
OK folks, the moment you have all been waiting for…….. THE BIG REVEAL!!! Here she is in all her glory, my new Living Room/Dining Room!!!! This is everything I LOVE. She boasts a gorgeous mill work backdrop, pops of color and a touch of gold!

What makes this room so beautiful you ask? This is the marriage of all of these beautiful pieces that make this look really come together. Let me break it down for you piece by piece. Lets start with the Mill work shall we?

ORC Room Reveal J&J Design Group

All of the walls are clad in baseboard from Metrie. I used their Very Square Scene II in the 5.5″. All of the walls are covered in this baseboard and finished off with this crown. I also decided to case out the windows. I love to do this any chance that I get. I feel that casing out windows always gives them a cleaner and more finished look. The windows are cased out with a series of the following pieces: Header, Sill, and Sides and Apron

Let us not forget about the gorgeous doors and hardware. I found the door hardware from Emtek and completely fell in love. I actually ended up purchasing these knobs for my whole house. Emtek is one of the only brands that I have found that has perfected the satin brass finish. I love the octagonal detail on the knob and the reason I love it on the doors, is that it adds another linear element to the circular detail on the door.

I chose my color palette around this beautiful Rug I found at All Modern. I love to use navy as my base color in a scheme and pop in bright fun colors. This particular rug hit all of those points for me. Another thing that sold me on the rug was the size of it. It comes in a 16’x 10’6″ size which fit my room perfectly and married my two spaces together although they have separate functions, Living and Dining.

Now that I have my base set, let us move on to the furniture. I have been crushing on these navy chairs from All Modern for at least a year now. When I found out that I was able to use them in my one room challenge I was ecstatic. I can just see my husband and I sitting here with a couple friends drinking cocktails and discussing our busy lives. Well, maybe once I finish the rest of my house! These chairs aren’t only comfortable but so soft to the touch.

The perfect touch to round out these chairs are the custom pillows I made with a couple Fabricut fabrics that I selected. On the front of the pillow I used this antelope fabric from their Vern Yip collection. I think adding a animal print to your space is always a good idea! I decided to add a bright pink to the back so it would have an extra “pop” peeking out from the back. I finished it off with a gold zipper.

Between my 4 chairs, I chose this gorgeous Lucite cocktail table from Lamps Plus. The reason I chose this table is that I wanted the table to read through and make the room feel more open. This cocktail table has the prettiest gold details that make it feel elegant. Because it has a glass top, you are still able to see my beautiful rug.

ORC Room Reveal J&J Design Group

Coffee table Accents: Books; Ivy Leauge, All In Good Taste, Bloom, Places to go, people to see

Lotus: Vintage | Vase: Hobby Lobby | Flowers: Yellow Reniculas and Pink Peonies

Moving on to the dining area. This is where I will definitely be hosting this year’s turkey dinner! I found the dining table at The Mine and it fit perfectly into my criteria; Marble top, brass base and seats at least 6. The reason I love this table is that it is such a timeless piece. I wanted to find a dining table that I could not only host dinner parties but have a little extra room to spread out if I am working on a large project.

ORC Room Reveal J&J Design Group

I must address the dining chairs because I know I will probably get questions on them. Here is their story! My friend found them for sale on Facebook. We drove down to a liquidation warehouse in Phoenix and scored them. I am not exactly sure where they came from but I like to think they are good Karma!

I wanted to bring the eye up with this gorgeous light fixture I found from Crystorama. This is from their Luna collection and is the perfect size for above my table. It has the most beautiful gold finish on the inside and white finish on the outside. When you move around the room the look of it changes and adds so much interest.

ORC Room Reveal J&J Design Group

Do you see the pretty artwork peeking through my light fixture? It is an amazing piece from Parima Studio. The reason I fell in love with it is the composition of all of the beautiful colors. I am always attracted to abstract artwork and had a hard time deciding on which one of her pieces I loved more. The piece was beautifully framed by FrameBridge in a simple gold frame.

ORC Room Reveal J&J Design Group

To soften the windows I added this beautiful drapery from The Shade Store. I selected the pinch pleat drapery panels in their Linen Cameo. Their satin brass curtain rods were the perfect match to my door handles, and chandelier. The drapes bring your eye up and add a soft pop of color to the architectural details on the walls and windows. Oftentimes, a room can feel naked to me without the softness of window treatments. Not only do they provide privacy but they also provide another opportunity to add a great design detail to your room.

ORC Room Reveal J&J Design Group

I think one of the hardest decisions for me was what to do with the wall to the right. I looked for art but I didn’t want to select something that was going to compete with my Parima Studio Artwork so I decided to do shelves. I wanted to display my collection of design books and a few fun accessories I had been collecting over the past few months. When I am out shopping for clients, I will pick up little things that I like and hid them away for an occasion such as this.

Here is the cute little styled shelf that I came up with. They are actually just shelves and brackets that I found at Home Depot. The brackets were white and I spray painted them gold to go with my overall look. Most of the accessories I found while shopping at HomeGoods.

ORC Room Reveal J&J Design Group

I decided to add in my bar cart in the corner of the room next to my dining table. This will be a handy little landing spot for a dinner party. I found this one at HomeGoods in the clearance section since the glass was a little chipped on one of the corners.

ORC Room Reveal J&J Design Group

I am so very happy with the way my space turned out! I would love to thank Linda from Calling it Home for inviting me to join in on the fun this challenge as well as the wonderful vendors whom sponsored this room. I am truly grateful to call this room mine and the many memories to be made here by my family and friends.


All my beautiful photos were taken by the talented John Woodcock Photography

xo,

Before Photo

After

ORC Room Reveal J&J Design Group

Make sure to check out the reveals of all my fellow challengers!

Centsational Girl |Chris Loves Julia  | Christine Dovey |Dwell With Dignity  | The English Room

Glitter GuideHouse of Brinson | House Updated  | J+J Design Group | Lark & Linen | Abby Manchesky

Nesting Place |Old Brand New |Old Home Love  |The Pink Pagoda  | Rambling Renovators

Erica Reitman |Sketch 42 | Suburban B’s | Erin Williamson  Media Partner House Beautiful | TM by CIH


One Room Challenge: Week 4

This week is shaping up to be pretty much more of what we were doing last week. Mill work, millwork and more millwork!! I have to say I am pretty obsessed with the way this wall treatment is turning out. I mean, stacking baseboards on the wall is a little bit of a crazy idea but the texture is amazing. I can’t wait to see all the pretty pops of color I have popping off of this awesome background. My mouldings and doors are all from Metrie and with their whole line of products, there is no stunting your creativity!

Check out the way the wood juts in and out and creates this cool texture.

One Room Challenge Week 4 wall detail

Another exciting thing that happened this week is that our wood floors went in. I feel like we are finally getting over the hump and it should be pretty much smooth sailing from now on (fingers crossed that is).

One Room Challenge Week 4

We still have quite a bit of caulking, sanding, filling holes and painting to do. After we finish the painting, we will install the hardware on the doors and the lighting. I am so excited to install this beauty I found at Crystorama! I just love the mix of the white and gold in this fixture. I feel like lighting is the jewelry to the perfect dress. It can really make or break a room. It is also important to have the correct scale when it comes to lighting. You don’t want to have a large table with a tiny chandelier. This chandelier is nice and large and will be oh so gorgeous over my new dining table!Crystorama Gold and White chandelier

I have a few items I have been wavering on the last few weeks. I couldn’t decide how I wanted to do the drapery. White drapery vs. blush drapery…. What is a girl to do? At first I was thinking I may just go white and have them blend into the wall and be very subtle. My heart was telling me blush pink ( I am currently obsessed) but will I tire of it? Well, life is about taking design risks right? I’m going with the blush…. I think! I found these great ones at The Shade Store, what do you think, pink or white?


This room has definitely been a group effort, but none of this would be possible without my amazing husband Dave that is always down with my crazy ideas. He is going to need a nice long vacation once our remodel is done!


So I leave you with this, unpainted walls and dirty floors. Two more weeks until the final reveal and I promise you it won’t disappoint. I may have even smuggled a tray I found while local shopping in Seattle home in my suitcase because it was just too perfect not to pass up for the coffee table. Until next update my friends!

XO,

Follow along with all my fellow Challengers!

Centsational Girl | Chris Loves Julia | Christine Dovey | Dwell With Dignity | The English Room

Glitter Guide | House of Brinson | House Updated  | J+J Design Group | Lark & Linen | Abby Manchesky

Nesting Place | Old Brand New | Old Home Love | The Pink Pagoda | Rambling Renovators

Erica Reitman | Sketch 42 | Suburban B’s | Erin Williamson  Media Partner House Beautiful | TM by CIH

One Room Challenge: Week 3

This project was created in a partnership with the One Room Challenge Sponsors!  

All ideas and opinions are my own!

One Room Challenge Week 3 is here! We have made so much progress so far! We have mostly been working on our Metrie moulding details. Our entire room is room is completely covered in wood moulding so naturally that is taking up the majority of our time. We were almost finished, and ran short on the base moulding we are using for the walls. We really wanted to get all the wall moulding and window moulding up so we could fill the nail holes and get it painted. It is generally best to paint your walls before you install your flooring. We may need to go to plan B and start laying the floor this week so we can stay on track with our timeline. This just creates a little more work for ourselves since we will have to mask off the whole floor before painting the walls.

Here are some more shots of the work we have completed.

One room challenge Week 3 Progress picture

How cool are these walls? I mean, c’mon!!!

One Room Challenge Baseboard detail on walls

And let’s not forget about these gorgeous Metrie doors!

One Room Challenge Week 3 Metrie Fashion Forward Doors

I wanted to keep the columns simple so they wouldn’t compete with the wall detail. Yes, those glass block windows are on their way out. This isn’t the only room in the house with problems, haha!

When we eliminated what was to be the formal dining room in our new house and made it into a walk in pantry and mud room, (something that was high on my list when looking for our new home)  I decided to turn the formal living room into a Living Room/ Dining Room. This way, we had one room in our home dedicated to formal entertaining instead of two rooms dedicated to it. Let’s be honest here, we don’t have a whole lot of extra time to host dinner parties and sit around with our friends (uninterrupted by children) sipping on cocktails and talking about world affairs. I mean, this isn’t the 50’s.  Although all those things sound great, we hardly use our current dining room or living room on a day to day basis. It is nice to have it for the holidays and the occasional dinner party. This room is one of the first ones you see when you enter our new home so it better be pretty right?

Here is the space plan I came up with to accomplish that goal. This space plan is perfect to sit with friends, read a book, do some homework with the kids and family game night. Not to mention a holiday dinner a few times a year.

One room challenge week 3 floorplan layout

Since the room was long, I was able to create two separate areas. I made the room feel cohesive with this very large rug I found at All Modern. When I design a room, I always love to start with what we like to call a “lead”. A lead fabric, painting, rug, pillow or artwork are good examples of color palettes already pulled together so you can pull several colors from them to use in your space.

The rug from All Modern was the “lead” in my design because it had all the colors I wanted to incorporate in the room. It also had almost all my favorite colors so when I saw it, I knew that was exactly what I had been looking for. The rug comes in a very unusual size of 10′-6″ x 16′-5″ so it was perfect for my entire space. It will really make the room feel cohesive and marry both areas together although they have separate functions. I think I almost died when I received it at my doorstep, it is so gorgeous!

One Room Challenge Week 3 Dining Room plans


1.Fuji Pink Area Rug: All Modern | 2. Fiddle Leaf Fig indoor plant |

3.Carrera Dining Table: The Mine

I am also very excited about the dining table I found at ATG Stores. The Carrera marble top and the brass legs is the perfect addition to my room. I can see many a turkey dinner or birthday being celebrated at this very table!

I found something a little unexpected for my dining chairs. I scored a major deal on the chairs from a liquidation warehouse in Phoenix. A friend of mine saw them for sale on Facebook and I scored 6 of them. They still need a new coat of paint but they are so cool and so comfortable!

Total Dining Room Chair score at the warehouse sale

Aren’t they bananas!!! I scored them for $20.00 each too!!

Once we get through this week, we will get to my favorite part which is bringing in the pretty furniture. Stay tuned to see what transpires and be sure to follow along with all my uber talented fellow challengers below.

XO,

Centsational Girl | Chris Loves Julia | Christine Dovey | Dwell With Dignity | The English Room

Glitter Guide | House of Brinson | House Updated  | J+J Design Group | Lark & Linen | Abby Manchesky

Nesting Place | Old Brand New | Old Home Love | The Pink Pagoda | Rambling Renovators

Erica Reitman | Sketch 42 | Suburban B’s | Erin Williamson  Media Partner House Beautiful | TM by CIH

One Room Challenge: Week 2

This project was created in a partnership with the One Room Challenge Sponsors!  

All ideas and opinions are my own!

Really?! How is it week 2 already? So much to do, so little time! I am feeling good though so far, one thing I know for sure is that everything takes longer than you think it will!! First thing is first, we had to demo the space, and by that I mean remove the existing nasty carpet, take down the short doors, and get rid of those hideous rounded columns. Oh, and don’t forget that awful tile YIKES!!!

Here is a picture after we finished the demolition. Look how open the room is now! Isn’t that crazy?

 One Room Challenge Week 2 Progress

The demo took about a day, then we had to pour the concrete for the steps that were missing where we ripped out the columns. I don’t know about you, but I love to tear out old and dated architectural elements.

After we filled in the steps we built out smaller square columns since we still had to hid a bit of duct work in the right column. We had a little re-wiring to do as well.

Next up was raising the header height on the doors. I love to do this any chance I get in a room. The taller doors bring your eye up and really make the room feel more grand. It can actually be a fairly easy thing to do, as long as the door way isn’t structural like mine is. As long as your ceiling is 9′ or taller, you can definitely fit in an 8′ door.

Raising Header Height on Doorway

I selected these gorgeous doors from Metrie’s Fashion Forward collection. I dreamt that one day I would have doors this beautiful in my home, thanks to the One Room Challenge, my dreams are coming true. Do you know what the best part is? They lead right into my home office so I will see these beauties everyday! I will be finishing them off with some gorgeous Emtek brass hexagon door knobs, they are like jewelry to the perfect dress!


Metrie Fashion Forward Doors

Photo credit: Metrie.com

It is not a secret that we love moulding over here at J&J! Working with Metrie, whom has such gorgeous door and moulding selections was so much fun. I wanted to create a “shiplap” look but with a twist. I found a baseboard that had an interesting profile and stacked it on top of each other to create this cool detail on the walls. We also cased out the windows with a more simple moulding to offset the wall detail. Here is a sneak peek of what we have so far. Once we caulk and paint, it’s going to be BANANAS!!!!!!

One Room Challenge| Metrie wall Detail | J&J Design Group

Let’s dig in a little bit and see what I am going to be doing with furniture in this fine One Room Challenge shall we? Like I mentioned in my Week 1 post, I like to design with a neutral back drop and pop in color. Here is a teaser with a few of the products I am using in my room. Let me know what you think!!

J&J Design Group | One Room Challenge Week 2

Sources:

1 Navy Velvet Chair : All Modern | 2 Lucite Coffee Table: Lamps Plus | 3 Chandelier: Crystorama |

4 Custom Pink Pillow| 5 Brushed Brass Knobs: Emtek | 6 French Doors: Metrie |7 Artwork: Parima Studio

 Can you feel it? Feel it starting to come together…… Oh my, I am so excited!!

Don’t forget to follow along with my fellow challengers below!

XO,

Centsational Girl | Chris Loves Julia | Christine Dovey | Dwell With Dignity | The English Room

Glitter Guide | House of Brinson | House Updated  | J+J Design Group | Lark & Linen | Abby Manchesky

Nesting Place | Old Brand New | Old Home Love | The Pink Pagoda | Rambling Renovators

Erica Reitman | Sketch 42 | Suburban B’s | Erin Williamson  Media Partner House Beautiful | TM by CIH

One Room Challenge: Week One

Having the opportunity to participate in the One Room Challenge is a dream come true for me! I have followed along on past challenges and love to see the rooms transpire. Being an interior designer, and designing rooms for my clients everyday is definitely rewarding, I get so wrapped up in my client’s homes that my home usually takes a back seat. I designed my current home that I am living in about 9 years ago, I was only a few years fresh out of design school, so let’s just say my tastes have changed just a bit. There were so many things I wanted to redo, new products came out and well, I just have so much more experience under my belt.

If you are new to the one room challenge, welcome! The One Room Challenge is a bi-yearly event where 20 designers and bloggers participate in a challenge to transform a room in their home. It is so much fun to see the progress of each room during the 6 week time frame.

My husband and I had a tough decision, build a new house, buy an existing home and remodel or remodel our existing home?? My husband refused to remodel a home we have already remodeled, building a new home had too many restrictions on what was available to choose from so we naturally took the toughest choice; buy an existing home and remodel it completely.

We found this beautifully dated (like the 90’s called and wanted their house back) property that had a great lot for my kids and a 4 car garage for all of our junk!! The floor plan works great for our family and we don’t have any wasted space like we do in our current home. Needless to say, the One Room Challenge couldn’t have come at a more perfect time for me!

I have decided to transform my living/ dining room for the challenge this season. I am so tired of my existing dining furniture, it was a wedding present and let’s just say we are celebrating our 10 year anniversary this year. The great thing about our new Living / Dining space is that it gets great natural light during the day. So here she is, in all her glory and it hasn’t been touched a bit since about 1992 that is!

Let’s have a little chat about all her problems shall we?

Rounded Columns: These columns are huge and block your view into the space. They have a undesirable 2″ moulding as does the rest of the room and a rather unattractive wall texture. So see ya later!!!

12″ Square Tile: I almost always steer clear of 12″ square tiles. I just feel that not only to they date the space, but they give a busy grid pattern that I don’t really care for.

Paper Shades: Let’s be honest, these just look cheap. I know they can serve a utilitarian purpose but they are not designer friendly, at least not for this designer:)

Eyeball Can light: This seems to be the only light available in this room at the moment, it gives a dark alley sort of feel at night that can be a little scary. You can point it anywhere you please, haha!

Short French Doors: I don’t mind the look of these doors, but they are very short and make the room feel squatty. I may be able to re-purpose them in another area in the house with lower ceilings.

Moldy Carpet: Water damage is apparent in the corner of the room. We think the washer may have leaked in a couple rooms over and pooled in the corner of this room. Needless to say, the carpet is history!

OK, now that your eyes are sore, let’s get to the pretty stuff shall we? I love interior design so much, I live and breathe it everyday. There is inspiration in nature, in experiences and in the people around us. I love to research design trends and get ideas from everywhere. Light and Bright interiors with a pop of color really make my heart sing and that is what I intend to achieve in my One Room Challenge this season. Here are a couple of rooms that I have designed for clients that I particularly love and would like to achieve the same feel in my own home.

This room is so bright and happy! The coral, emerald green and navy are a few of my favorite colors.

A touch of gold is almost always a must for me as well.

Photo Credit: John Woodcock

This room may be one of my very favorites! Navy built in, gold hardware, striped drapes, hits of pink,

this is my love language!

Photo Credit: John Woodcock

Make sure to stay tuned as my room makes it’s way into the 20th century. I expect hiccups along the way because no good design doesn’t have them. Tune in next Wednesday to see some demo and plans of what I come up with. Make sure to check out my fellow participants rooms as well (listed below).

XOXO,


Centsational Girl | Chris Loves Julia | Christine Dovey | Dwell With Dignity | The English Room

Glitter Guide | House of Brinson | House Updated  | J+J Design Group | Lark & Linen | Abby Manchesky

Nesting Place | Old Brand New | Old Home Love | The Pink Pagoda | Rambling Renovators

Erica Reitman | Sketch 42 | Suburban B’s | Erin Williamson  Media Partner House Beautiful | TM by CIH


Transformation Tuesday: Tuscan to Transitional

Here in the Southwest, the Tuscan and Mediterranean look was big in design for quite a long time. It seems more and more these days clients are asking us to take the “Tuscan” out of their home.  Clients are looking for a lighter and brighter look. This is more of a transitional look with moldings, textures, and bright pops of color on a neutral background.  We have been mostly working on large remodels and love to transform spaces to happy places our clients love to live in.

Let’s take this kitchen for example. This kitchen was very Tuscan, dark and needed to be laid out more efficiently for the uses of our client.

Before

Our client’s love to entertain and have friends over whenever they have the chance. We created a large island for entertaining that doubles as a dining table for family dinners. We relocated the stove to the center of the kitchen as a focal point and lightened it up with white cabinetry. The large double refrigerator is now located where the existing stove was.

After (Photo by: John Woodcock Photography)

This is a different angle than the before picture, but i promise you this is the same kitchen! Can you believe it! Many drawings and months of planning the kitchen is a great gathering space for this sweet family.

XO,


RenoJOvation Part 1

I am so excited to share “reno JO vation” with you, the renovation of my personal home.  My husband and I bought a home on a gorgeous lot that was sitting unoccupied for over 2 years. The home has so many great attributes but it is very dated. We decided to gut the whole thing and make it our dream home. I thought it would be fun to document the process with a video series and this is the first episode to our series. Please comment and let me know what you would like to see during the process!


XO,

jo

Marin’s Boho Cactus Room Reveal

We all need a Boho Cactus Room in our home right? Designing rooms in my own home is always a little daunting, but so much fun at the same time. It is funny because when I design for clients I feel like a have a clearer vision of what I want to do. When it comes to my own house I flip flop on ideas, fret about it and sometimes just sit on it for a while until the ideas start flowing. Marin’s new room was no exception to this!

When I told some of my friends that I was going to be re-designing Marin’s room they were shocked (Well, maybe just a little). I got a few responses like “what? you just did it”, “but it is so cute why do you want to change it?”

Yes, I still think it is cute but I designed it almost 5 years ago and well, I’m sick of it now! I guess that is just one of the bad things about being a designer, trends come and go and you want to keep things fresh. Here is the before of Marin’s room, this is what it has looked like since she was 2 1/2.

Watermark Marin on bed

John Woodcock Photography

Awww, look at her, isn’t she cute! My baby has grown up way too fast. Now that Marin is in 1st grade I decided that I wanted to give her a room that had a little more room for her to hang out with her friends as well as an area for her to do her homework.

I collaborated with our friends at Serena and Lily to create a room for Marin that reflected her personality. Here is the design board that I came up with for her new room.

Marin design board

I was flipping through a Serena and Lily catalog and I totally fell in love with this daybed. This is their Avalon daybed and it is made from rattan and had the perfect Bohemian look I was going for! Once I laid eyes on this bed, I knew I had to build her room around it.

JandJ_Marin_ 47

John Woodcock Photography

I love this rug because it has so many fun colors to pull out if it and use around the room. The rug has a vintage Turkish rug vibe that I was totally into, I knew it would add so much character to the room. Let’s move on to the cactus. This was such a labor of love for me. I designed on the computer and then cut each piece out of wood on a laser cutter. Once I had all the cactus pieces cut out, I hand painted them all with watercolor. Yes, I am a little crazy but I am so happy with how it turned out!

IMG_7757

Here are the cactus after I cut them, next I laid them all out and numbered them so I could put them back together in her room.IMG_7844

This is a photo of the cactus once I painted them with watercolor. It took me about 6 hours to paint all of the cactus and I did it over several days, accompanied by Netflix of course!

JandJ_Marin_ 1

John Woodcock Photography

I added a few silk flowers that I found at IKEA, the color and scale was perfect for what I was looking for. I attached the cactus to the ship lap walls with a pin nail gun. I can easily take them down and bring them with me when we move to our new home in a few months.

JandJ_Marin_ 6

John Woodcock Photography

A desk area was a must in Marin’s room. She is very creative and loves to draw and do crafts. Let me promise you this, it is never this clean! The desk was one of my vintage finds that I had painted in a fun pink color. One of Marin’s favorite things in her room is the art print of the lady. She thinks it looks just like her:) We also love that the artist’s name is Maren! Find her print here on Etsy.

JandJ_Marin_ 26

John Woodcock Photography

Let’s not forget what might be the best part of the room…… her hanging chair. This amazing chair is also from Serena and Lily and she loves it so much. Whether it is listening to music or reading books, it is always just a little more fun when it is in your very own swinging chair! Gosh she is growing up way too fast.

Disclosure: I was not financially compensated for this post. I received a sample for review purposes. The opinions are completely my own based on my experience.

xoxo,

jo